I have spoken a lot in this blog about the process of bringing machine learning code to production. However, once the models are in production you are not done, you are just getting started. The model will have to face its worst enemy: The Real World!

Image credit to: Tim Smit
This post focuses on what kinds of monitoring you can put in place in order to understand how your model is performing in the real world. This considers both, continuous training as well as the usage of the trained model. It looks into:
- Monitoring your infrastructure
- Monitoring the data
- Monitoring the training
- Monitoring value in the real world
Monitoring your infrastructure
Engineers building any system generally have some monitoring in place in order to make sure that services are up and infrastructure is not at capacity. This kind of monitoring can be useful for your machine learning components as well, as it can help you spot:
- Changes in the frequency and quantity of incoming data.
- Changes and failures in third party systems that we may depend on for data or processing.
- The need for upgrading the infrastructure with growing demand.
- The need to optimise/distribute the code of your machine learning components with increased consumption of data.
- The need to re-evaluate your chosen solution when certain limitations are reached.
Some of these situations can also have certain less obvious implications for your models. For example, an increase/decrease in the quantity/frequency of the data being received could indicate that some event has occurred in the real world (storm, earthquake) which may in turn skew your model’s results. It may also be a side effect of something like a security breach, such as an attempted DDoS attack, which may in turn negatively affect your model results (e.g. in a recommendations system).
Some popular tools for such kind of monitoring include, but are not limited to:

Monitoring the data
The real world changes, and so will your data. As this is the most important component for training and using a model, we need to have something in place to understand when data has drifted in order to act on it.
This can be done by keeping track of some statistics (median, variance, standard deviation, etc) about your data. You can calculate these for the data that you use to train your model, and keep track of them over time, with every new training run. You can then also do the same, at a certain frequency, over a batch of the latest data having been used for inference in the model. The two graphs will help you understand:
- Whether input training data has changed over time, and how much.
- How often data is changing, and whether you may need to train models more frequently.
- Whether the data being selected for training is in different to the data that is being used for inferencing. This could be a symptom of not training often enough, but it can just as likely be caused by the selection process for training data, which may be biased.
A scenario where data has changed will likely result in the need for you to investigate what the changes are and whether they need to be acted upon. Such changes may indicate that the relationship between the input and output has changed, or that something in the real world has affected the data either in an expected manner (e.g. price changes) or an unexpected manner (e.g. natural disasters). It may also be that the change is not having any effect on results and needs no further action.
In addition to these statistical measures, one could implement a set of validations, which in turn provide alerts when data does not match expectations. For example, alerts triggered by minimum/maximum rages for certain features being exceeded, an acceptable threshold of missing data being surpassed, or the difference between the statistics of the training and inferencing data being larger than a threshold.
Image credit to: xkcd
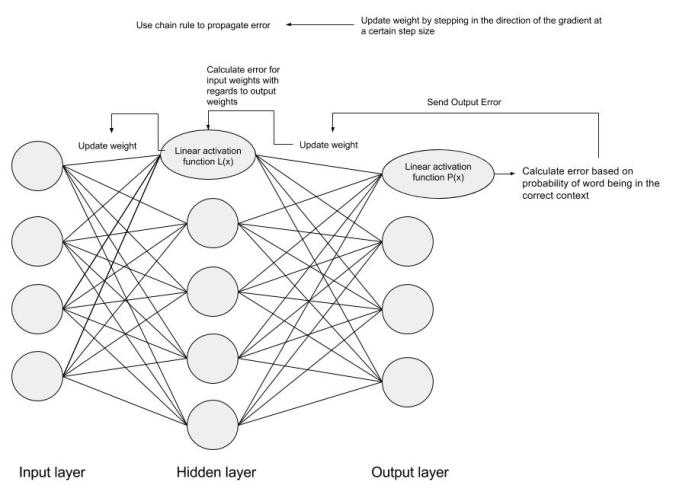
Monitoring the training
You are probably training your model at a certain frequency in order to keep up with the changing world. There are certain things that you can keep track of during this training process which can help in spotting changes and investigating problems. These include:
- Keeping track of feature importance, where the algorithm that you are using allows it. A change in which features are most important may indicate a possible drift in the data, or a change in the relationship between the input and output.
- Keeping track of model quality measures (F1 score, accuracy, etc). It may be that the new model suddenly performs significantly worse when compared against an old version. This may indicate a change in the data which makes the current approach outdated or inappropriate for the problem being solved.
- Keeping track of statistics about the input data being used to train the model. This was mentioned in the previous section.
- Keeping track of any other model KPIs that may be indicative of the model’s performance within the the product (e.g. use case validation)
A change in these measures may be indicative of a problem in the new input data, either because of data drift, or a problem in the data cleaning process. Additionally, it could also be an indicator of a need for a different approach that would work with the new state of the data.

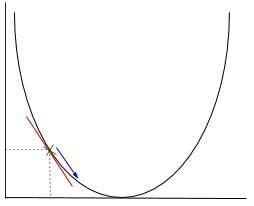
Image credit to: kdnuggets
Monitoring value in the real world
For every software system in production we need to understand how this software is being used by your users. We do this through analytics, which involve gathering data about what end users are doing on the application, in order to infer the value of certain features. In the same way as with a rule based system, analytics can help you understand what the effect of your machine learning components is on the product and users.
A change in user behaviour on a feature that is driven by machine learning, for example, could indicate that a new model version is no longer providing positive value to the user. Alternatively it could also mean that the model is outdated given a change that has occurred in the real world.
This kind of data is often displayed on some interactive dashboards that allows people to monitor certain important KPIs, as well as generate reports for interested stakeholders. In certain systems, this data is also used to pin point problems by providing alerts based on a change on these KPIs. The KPIs that may be affected by your machine learning driven features are the ones that you can leverage. These can help you understand the effect that changes to these features has on the overall user experience in the real world.

Image credit to: Dilbert
As you can see, you have many options for monitoring your machine learning components once they go out into the wild. You don’t have to implement all of these. Determine what makes sense for your team, the problem that you are solving, the possible problems that you foresee, the approach that you have chosen for the solution, and the maturity of the product.
If you have done something different that worked well for your team, please share it on the comments 🙂
Now go put some beautiful graphs on that abandoned screen!